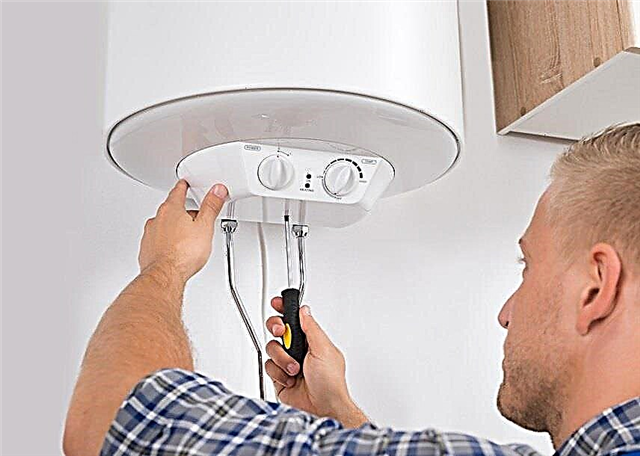
Flowing water heaters operating on natural and liquefied gas - the devices are quite reliable and break down infrequently. Minor malfunctions that occur during operation, the user is able to fix on their own. A gas master solves the problem literally within 5 minutes, but demands to pay for the call - is this a familiar situation? Avoiding such incidents is not difficult - try to repair the gas column with your own hands, guided by our instructions.
Water heater operation algorithm
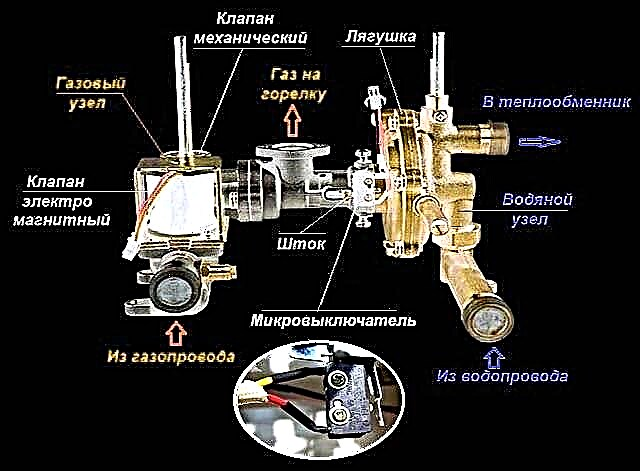
If you have little idea of the device and the principle of operation of a modern gas column, we recommend that you familiarize yourself with this section, otherwise it will not be possible to repair the device. The design of an atmospheric heater with an open combustion chamber is shown below in the diagram.
Note. The photo shows an old-style column with manual ignition of the burner from the piezoelectric element. Updated versions of devices (including the Russian brand Neva) are ignited automatically, the power source is batteries or a 220 volt home network.

The turbocharged column is arranged in a similar way, only the combustion chamber is completely closed, and the fan supplies air to the burner. The algorithm for starting the unit and heating water for the needs of hot water looks like this:
- After opening the mixer tap, a flow occurs through the water unit and the column heat exchanger.
- A membrane installed inside the frog body pushes the stem forward due to water pressure. The latter compresses the spring of the mechanical valve in the gas block, opening the passage of fuel to the burner.
- At the same time, the rod releases the microswitch button, closing the solenoid valve circuit. It works and starts the gas in the supply pipe, where there is already open spring valve.
- At this point, the pulse device supplies a high voltage discharge to the electrodes mounted near the burner. From a spark ignition occurs, heating of water begins.
- 3 sensors are sequentially included in the electromagnetic valve circuit - traction, overheating and flame (ionization). When the latter detects the presence of fire, sparking stops.
Reference. In old water heaters, instead of two electrodes that ignite the main burner, one contact and a constantly burning igniter are used. The presence of flame is monitored by a thermocouple.

Now consider the most important point necessary for a successful repair. Under what conditions does the column turn off automatically (main burner goes out):
- when the flow and pressure of the water disappear, the “frog” releases the pusher, the micro switch opens, the power of the electrovalve is interrupted;
- if the ionization electrode does not “see” the flame and does not give a corresponding signal, the magnetic valve closes the gas;
- draft disappears in the chimney, the sensor breaks the circuit and the electromagnet shuts off, blocking the fuel supply;
- Similarly, the overheating sensor mounted on the heat exchanger acts on the gas block.

Having understood the principle of operation, you can proceed to diagnose column malfunctions and do-it-yourself repairs.
The column does not light up initially
Before climbing inside the water heater, it is worth performing a series of elementary actions:
- Replace the batteries and clean the contacts in the power compartment.
- Ensure that there is natural chimney draft and normal pressure in the cold water system.
- On a turbocharged mains powered column, check the fuse. Try switching the imported unit by turning the plug over in the socket - some models are sensitive to phase arrangement.
- Clean the dirt filter installed on the cold water supply pipe. Sometimes the mesh at the entrance is provided by the very design of the water heater.
- After opening the hot water mixer, observe the ignition electrodes - a spark should jump on them. In a turbocharged apparatus with a closed chamber, the clicking of discharges is clearly audible.

Tip. If there is external access to the ignition electrodes through the window, immediately clean their working part with a long brush.
Have the listed activities failed? Then remove the column cover and proceed to troubleshooting, following the step-by-step instructions:
- Open hot water (ask an assistant) and watch for the movement of the stem, which should move the pressure plate away from the microswitch button. If the pusher does not move, the reason is 100% hidden inside the water block. We'll have to disassemble it, clean it and change the membrane.
- The stem presses on the plate, but the button remains pressed. Probably, the stroke of the pusher decreased due to scum inside the "frog", which needs to be opened and cleaned.
- The pusher moves, the button turns off, but there is no sparking. Surely the microswitch is to blame, diagnosed as follows: disconnect its connector and close the 2 terminals with a screwdriver. If the switch fails, a spark will appear on the electrodes after a direct short circuit.
- The discharge slips on one needle, the second is silent. Pull the high voltage cable out of the electrode housing, slightly trim and reinsert it.
- The “frog” is functioning, the microswitch is tripping, the electrodes are sparking, but the ignition does not occur. So, no gas is supplied - the electromagnetic valve is closed. The culprits of the open circuit are traction and overheating sensors; to check them, you need to alternately close them with a wire. Another option is a break or a fracture of the lead wires, diagnosed by dialing with a multimeter.


An important nuance. When you find a malfunction of the microswitch, be sure to inspect the body of the water block at the installation site. It happens that the element fills with water dripping from under the stem seal. It is necessary to dismantle the "frog", pull out the leaky seal and put in a new spare part.
How to replace the membrane
The procedure for replacing a rubber (or silicone) diaphragm differs little on columns from different manufacturers. To independently remove and disassemble the gas-water unit, you will need a standard tool - open-end wrenches, screwdrivers and pliers. The procedure is as follows:
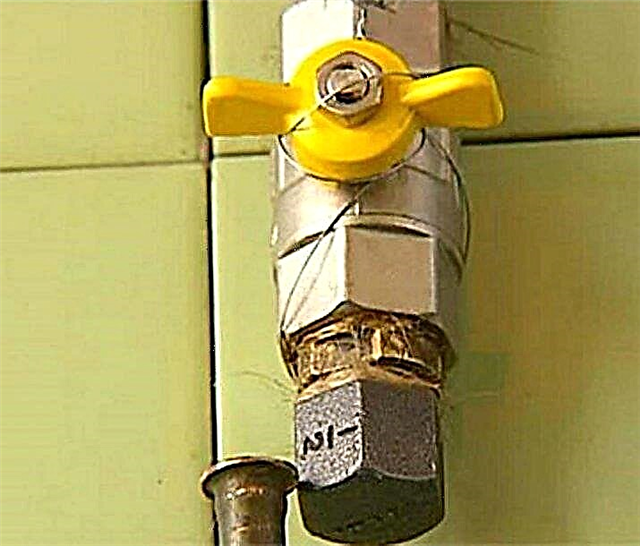
- Turn off the taps of gas and cold water on the supply pipelines, remove the casing of the device.
- Disconnect branch pipes of a water supply system and fuel supply.
- Unscrew the heat exchanger tube from the “frog” (located on the right), move it to the side, or disconnect the interfering wires.
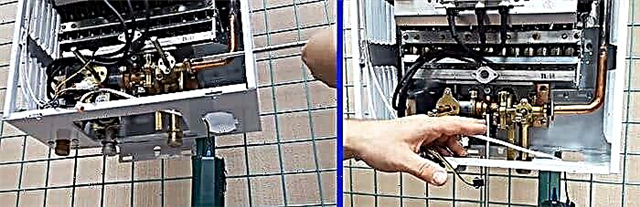
- Unscrew the mounting of the unit to the housing and remove the assembly assembly.
- Disassemble the diaphragm block by loosening 4-8 mounting screws. Remove the unusable diaphragm and put a spare one, having previously cleaned the inside of the camera from scale and dirt.


Note. On simple Chinese devices, the “frog” can be disassembled without removing the entire water-gas block. It is enough to disconnect the heat exchanger pipe and the screws on the flange.
Disassemble the mechanism carefully so as not to lose the gaskets or rubber rings. Assemble in the reverse order, after connecting the gas pipe, test the reliability of the joints by the method of washing.
On obsolete columns with a wick and a thermocouple, the membrane is changed according to the same technology. The difference is in the orientation and location of the water node - here the block stands upright, as shown in the photo.

Change the leaking stem seal
If you notice a leak of water dripping from the frog onto the micro switch, immediately replace the worn seal. A wet “trailer” will quickly become worthless, the column will stop igniting and as a result you will have to buy 2 parts instead of one.
How to replace the oil seal yourself:
- Do all the water block dismantling operations specified in the previous section.
- Disassemble the "frog", put one half with the membrane aside. From the second part, remove the plastic plate by slightly prying it with a screwdriver.
- Unscrew the nut from the inside with a ring wrench or head and remove the pusher.

Reference. The method of mounting the gland and stem depends on the brand of the gas-using hot-water installation. In the Neva columns, the pusher is pulled out with the plate, and the rubber ring is hidden under the screw.

You can go further in 2 ways: replace the entire stem (recommended) or only rubber sealing rings. The first is at the end of the pusher, the second is pressed into the nut. Obtain identical sized rings and replace worn parts.
Please note: the length of the stem and the diameter of the gland depends on the brand and brand of the gas column; it will not work with another model. The disassembly process is illustrated in the video:
Why does the column go out
Let us reason logically: if a gas burner device is ignited, then the water block and the sparking system are working properly. The problem lies in the solenoid valve, more precisely, its shutdown and interruption of fuel supply. Troubleshooting is reduced to 3 sensors:
- traction;
- ionization;
- heat exchanger overheating.
The malfunction of the draft sensor has already been mentioned above - an unsuitable element did not allow the column to start. The fact is that heaters of various brands can work in different ways, in some the draft sensor does not allow the burner to light, in others it fires later, after a gas outbreak. Result - the column lights up and immediately goes out.
The verification method is unchanged - we close the traction sensor terminals with a wire and turn on the water heater. If the burner does not go out, put a new part. Constantly using a jumper wire instead of a dead draft thermostat is strongly discouraged!

The flame ionization sensor (thermocouple) generates direct current when the end of the needle is heated by the burner flame. The signal is sent to the control module and the coil of the safety solenoid valve, keeping it open. Traction and overheating sensors are connected in series with the same circuit.
Key moment. Once the signal from the thermocouple disappears, the electromagnet turns off, the gas flow stops - the column goes out.
How to check and repair the ionization sensor:
- An insulated cable from a pulse ignition module is suitable for a needle located in the combustion zone. Remove the end of the wire from the socket and shorten it by 0.5-1 cm to ensure reliable contact.
- Adjust the gap of 6.5 mm (or another according to the manufacturer's request) between the end of the needle and the surface of the burner for optimal heating immediately after ignition.
- If the previous steps did not help, try closing the terminals of the overheating sensor attached to the heat exchanger with copper wire.
- Does the column continue to fade a second after ignition? Dismantle the thermocouple, connect a voltmeter to its contacts and heat the needle with a gas stove burner. A working sensor will give a voltage of 0.02 volts or more. If the figure is less, go buy a new thermocouple.
In rare cases, the electromagnet itself or the ignition module coil fails. The first one can be checked with an ohmmeter - connect the device to two of the three terminals in turn. Normal readings on the first pair are 400 ... 600 Ohms, on the second - 7 ... 8 Ohms, on the third - about 400 Ohms (data for Neva speakers are shown, on other devices may vary). To diagnose a pulse block, you will have to call a specialist.
When the water heater turns off after 5-15 minutes after start-up, the following types of problems are possible:
- the heat-exchange cells are half full of scale, the water flow is weak, the device quickly overheats, which triggers the sensor;
- too little pressure in the water supply, the result is similar;
- malfunctions of other components and parts leading to critical heating of the heat exchanger.
Conclusion. If the burner shuts off after a while, you should look for the cause of the overheating, the sensor itself is probably in good condition. A common problem is the long-term scale in the heat exchanger, which can be removed in various ways at home.

Other malfunctions of flow heaters
In addition to the listed problems, column owners have to deal with the following problems:
- weak sparking, sometimes single discharges slip, gas does not flare;
- ignition is accompanied by strong cotton;
- after closing the DHW valve, the burner continues to work until the electromagnet shuts off the fuel supply due to strong heating (at the command of the sensor);
- spontaneous ignition after connecting to a power source;
- insufficient heat;
- water flows from the water heater.
Advice on weak discharges on electrodes. If the batteries and contacts are in order, try to clean the ends of the electrodes, adjust the gap between the needles and the burner plane (the value is indicated in the product data sheet). If there is no result, call the master - most likely, the reason is in the pulse block.

Problems with sparking produce pops - the gas manages to accumulate in the combustion chamber before a sufficiently powerful discharge is formed. If the spark remains weak, the mixture of fuel with air ignites when a high concentration is reached, which is accompanied by a microexplosion. There were cases when pops damaged the heat exchanger, broke seals and normal contact in the electrical circuits of the sensors.
Continuing heating after turning off the water is a rather dangerous malfunction. If it coincides with the failure of the overheating sensor, a vapor phase is formed in the heat exchanger, capable of breaking copper tubes and cells. The reason is the sticking of the “frog” stem, which opens the gas valve. How to repair:
- Remove the water module according to the instructions above.
- Disassemble the "frog", remove the plastic plate.
- Unscrew the nut (or screw) in the left half of the membrane chamber, remove the pusher.
- Change the seals, thoroughly clean all parts, including the spring monostat (located on the right side of the "frog" behind the membrane).
Spontaneous start of heating without turning on water is a consequence of jamming of the pusher. When the burner of the device does not turn off and the thermostat trips, the user temporarily turns off the power source. Since the stem remains pressed, after resuming power supply, the column turns on itself, without opening the DHW valve. The “treatment” method is described above.
The reason for poor heating is the total pollution of the main elements of the unit - the heat exchanger and burner. The column needs to be completely disassembled and maintained, it is better to entrust such work to the master. In the event of burn-out and leakage, the heat-exchange unit must be removed and properly sealed, which is not always possible to perform at home.
Conclusion
We examined only the most common breakdowns of instantaneous gas water heaters, which are relatively easy to repair. It is unrealistic to make out rare and exotic situations, there are too many of them. Example: you made repairs in an apartment, installed new outlets, reversing the phase and zero. Because of this, a turbo-station of imported origin may go into error. And the last: if the spark weakens on the electrodes or the spark disappears, try to move the batteries in the compartment in a banal way.