In an effort to improve the convenience of controlling electrical appliances, manufacturers are creating new types of functional devices. One of these is a triple switch.
We will consider in more detail what design the three-key switch has and what nuances to consider when connecting the device.
Three-key switch design
Switches of this type with standard dimensions of the devices are equipped with three keys located close to each other. Their main purpose is to provide the ability to simultaneously control three groups of connected lighting devices from one common access point.
Most often, such devices are installed in rooms with a complex configuration: combined bathrooms, long corridors combined with living room kitchens.

It is convenient to use the three-key switch to control both the main and auxiliary lighting, for example, to implement the ceiling / wall / floor diode backlight circuit
Three-key devices are convenient for controlling multi-track chandeliers. To obtain three options for saturated light, they can be included in three stages, in which first one lamp lights up, then the next two.
Among the indisputable advantages of three-circuit devices include:
- Presentable appearance.
- Space saving.
- Easy installation.
The simplification of the installation procedure of the three-key switch is achieved by reducing labor costs when creating a common technological niche for placing the core of the device and laying an electric cable to it.

With well-chosen electrical parameters and the correct observance of the operating mode of the three-key device, even the budget model of the switch is able to work without fail for many decades
The design of the three-key switch is quite simple and includes two components:
- The inner part, which is a movable mechanism, where the process of closing / opening the network under the action of compression / extension of the spring.
- The outer part, which is a box with a switch button, to which the contacts are permanently attached.
Since the load on such devices is somewhat higher in comparison with simple types of models, the internal elements and the external case are made only of high-quality materials.
Image Gallery
Photo from
Installing a three-key switch will allow you to rationally organize the space, increase ease of use and minimize the number of devices located on the wall
Triple switches have many uses. One of them is the management of three or more carob chandeliers
Most often triple switches are used to control different lighting zones. In this case, the three devices are combined in one frame, connect them separately
On the back side of the triple-switch caliper, responsible manufacturers provide schemes and connection options
The triple circuit breaker has four contacts. Three of them go to different bulbs or lighting lines, the fourth to the entrance. Depending on the wiring diagram, either one supply line or three for each lighting branch is brought to the device
In the case of three different lines being connected to the device, essentially three single-key switches are located in one frame. There are a lot of variations in functionality, for example, one of the devices can be with a timer
If in addition to the three keys with which the light is activated and turned off, the device also has a dimmer, then the owner can adjust the intensity of the light flux
An important factor in choosing a triple switch is its design. In addition, the degree of protection against moisture is also important for installation in kitchens and bathrooms.
Switch for competent organization of space
Device for controlling chandelier bulbs
Triple switch with loop-through radio
Three-key connection diagram
Serial connection of contacts
Three-key timer switch
Three-key switch with dimmer
Wiring Product Design
The main types of closing devices
Switches, including triple, depending on the control method are keyboard and touch performance. The first are set in motion by pressing a key, the second - by touching the panel in a specific place.

Most models of touch switches are equipped with a dimmer - a device for smooth six- or seven-step adjustment up to turning off the light
When choosing a dimmer, it is important to focus on the total load of the switch. Experts recommend purchasing devices with a power reserve. For example: for a three-arm chandelier with lamps within 100 watts, select a dimmer that has a marking of 300 W.
Read more about what a dimmer is and how to choose it, read in this material.
Depending on the type of installation, triple switches are of three types:
- for outdoor installation;
- internal, involving deepening into the cavity of the wall;
- combined models having a common housing with a socket.
Combined models equipped with an outlet have a narrower scope. This is due to the fact that their installation is impossible without reworking the wiring.

When installing a combined device to the same point, you have to bring two separate wires for the outlet and at the same time take away the phase wires for lighting
The installation of a triple switch, combined with a socket in a common housing, is justified in those situations when it is supposed to equip open wiring. Electrical safety rules strictly regulate the height of the switches and sockets - 150 cm from the floor.
For this reason, such models are installed in places where sockets are operated quite often, provided that the switches at this height are convenient to use.
Combined models received the greatest distribution at arrangement of bathrooms with placement near mirrors and bedrooms in a zone of bedside tables.
Separate subspecies distinguish triple switches of wireless design, which can be installed anywhere and placed on any surface.

The wireless model is a different type of switch, which is more similar in design to the remote control
Wireless devices are equipped with two modules:
- Receiver - A relay type device integrated in a light source. When a signal is received, it closes the lighting circuit.
- Signal transmitter - the circuit breaker itself, equipped with an energy generator. When you press a key, it processes the energy pulse into a radio signal.
Such high-tech devices are expensive. Instead of the usual wiring, they use infrared or radio waves.
There are also on sale switches equipped with a backlight. They are convenient in the sense that at night they create a light signal, which serves as a good guide for finding the device quickly.

The backlight on the switches additionally serves as a pointer, which signals an inoperative state of illumination, since it turns on at the moment when voltage is not supplied to the device
When choosing such models, you should pay attention to the type of lighting source. Illuminated switches do not cause trouble only when connected in a circuit with conventional incandescent lamps or their halogen counterparts.
If fluorescent lamps or LED strips are used in a circuit with such a device, then even with the switch off, they will continue to emit a light pulsating glow.
Competent selection criteria
When purchasing a triple switch, carefully inspect it, examine the physical quantities, check the availability of the wiring diagram.
Key points to consider when choosing a product:
- Product body - it should be free from any kind of defects: burrs, dents and chips.
- Key Triggering - It should happen easily and without jamming.
- Sound effects - when each of the keys is turned on, a characteristic click should be heard.
- Core - It should also be free of burrs, and its terminals should work properly.
When planning to install a switch in a room with high humidity, it is necessary to choose a device with protection.

The operating elements of the moisture-proof circuit breaker have an additional rubber or plastic shell, which protects the mechanism from direct contact with water
In order to simplify the installation procedure and at the same time ensure the durability of the device, preference should be given to models whose cores are equipped with screw or clamp type terminals.
During the installation of triple circuit breakers of imported production, especially Korean and Chinese products, difficulties may arise, which are worth considering in advance:
Image Gallery
Photo from
Chinese switch brand Livolo
Mounting box of the same manufacturer
Trimming the cylindrical protrusions for mounting
Podrozetnik Belarusian production
Device Connection Technology
Connecting three-key switches is practically no different from the installation technology of one-and two-key analogs.
The point is that one of the supply cables is connected to the input of the switch, and lighting cables are connected to the input contacts of the connection blocks. The difference is only in the total number of contacts of the involved switching groups located in the device case.
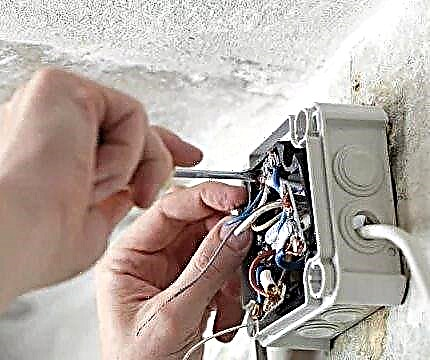
Preparatory work
The first thing to do before connecting or disassembling the three-key switch is to disconnect the switch for a while and make sure that the network is disconnected. Before starting work, you need to understand the wiring to which you plan to mount the device box.

According to this connection scheme, when installing the unit for installing the combined model from the junction box, a separate core must be laid separately, which will ensure the functioning of the outlet
It will not be possible to connect the switch without a set of the following tools:
- voltage indicator;
- stripping tool;
- Phillips and flat head screwdrivers;
- hammer drill equipped with a crown;
- building level;
- insulating tape.
When the switch is installed internally, a socket box and a small portion of gypsum or alabaster will be required to accommodate the core of the device. To assemble the wires and connect the contacts inside the junction box - self-clamping terminal blocks.
Assembly of wires in the junction box
Two wires are supplied from the shield to the junction box.
It is easiest to determine their affiliation by the color of the braid and marking:
- "zero" - painted in blue;
- "phase" - has a brown braid.
For the reliability of the conclusions when determining the ownership of the wires, it is better to use a tester.
Six wires come from the lamps into the junction box. The task of the wizard is to connect three of them among themselves, and then connect to a working zero, coming from the shield. The remaining three wires can only be directed to the switch and docked with its outputs.

The wires connected to the junction box are interconnected using self-clamping terminal blocks or using the usual twisting method
The main points to consider when assembling the wires in the junction box cavity:
- Zero supply wires are connected to all the “zeros” of powered lighting fixtures.
- The phase of the supply wire is connected to the common contact of the switch.
- The remaining three wires coming from the switch are connected to the corresponding three phase wires that came from each lighting device.
Having connected to the release one common phase for all light sources, a circuit is created in which at the moment of closing one of the contacts of the circuit breaker one or another lamp lights up.
Installation of a socket in a niche
The socket is only used when installing indoor switches, the core of which half goes into the wall. The main requirement for the installation of the socket is that its edges are flush with the wall and do not protrude beyond it. Otherwise, after installing the core, the switch housing will protrude from the wall.

To deepen the core of the device into a niche in the cavity of the working surface using a perforator equipped with a crown, make a hole with a depth sufficient to accommodate the "glass"
Commercially available podrozetniki can vary in color, shape and the presence of side protrusions. If the installation method is taken as the basis, then the “glasses” are divided into two types:
- For concrete - solid structures that are fixed in the wall by means of plaster or alabaster.
- For drywall - designs are equipped with special paws with which they burst in the wall.
Regardless of the design, any socket is equipped with pressed-in holes through which an electric wire is inserted into the cavity of the structure.
We also recommend that we read our other material, where we talked in detail about the technology of installing podrozetniki in concrete and drywall. More details - follow the link.
A “glass” with a wire inserted into it is buried in a pre-made niche, leveled with a level on the horizontal and vertical plane and fixed in the wall.
3-key switch wiring diagram
To gain access to the triple-switch mechanism, the keys are removed from the device and the decorative frame is removed. This work is not difficult to do with a flat screwdriver.
To remove a key, you just need to press it, turning it to the “off” position, and gently protrude the edge protruding from the opposite side, without excessive force, using a screwdriver tip.

In fact, from the back side of the triple switch you can clearly see where the phase is brought in, and where the wires coming from the lamps are connected - they are divided into separate blocks
Four wires will be routed to the switch installation site.
They can be combined into a four-wire cable or be a combination in which:
- single-phase phase comes from the junction box;
- three-core, which through the distribution box delivers a phase to the connected lighting devices.
The zero wire will pass directly from the junction box to the lights, bypassing the switch.
The incoming phase is connected to the input terminal marked with an arrow, and the three outgoing terminals are connected to the output wires of the fixtures. Which output to which terminal does not play a special role. If you want a specific terminal to be responsible for this particular lamp, reconnecting the wires will not cause any special difficulties.
The wires in the mechanism are fixed by means of clamping screws. Before inserting the bare ends, it is important to make sure that the screw rods are not completely screwed into the grooves. Having brought the ends of wires cleaned from the braid into the mechanism, tighten the screws tightly. When checking the wires for removal, there should be no backlash.

In the mechanism, the common terminal for the phase wire is first separated and only after that are the terminals for supplying voltage from the individual lighting sections
The basic rule for connecting the three-key switch circuit is that the network input phase wire is not brought to the input of the device, but not zero. Zero network wires are connected exclusively to the "zeros" of lighting fixtures. This rule is strictly regulated by the current standard - PUE.
Some craftsmen neglect this rule, directing the phase wire to the lamp, and feeding “zero” through the switch to break. With this build option, the network will still work. But such a decision is fraught with danger during the operation of the electrical system, because even with the switch off, the wiring will still remain energized.
This is dangerous because even with the usual replacement of bulbs, a person will be exposed to the risk of electric shock every time. And if a breakdown of insulation occurs at all, and there is no grounding of the connected lighting device, voltage will appear on the device case.
As a result, with the slightest contact with the surface of the device, an electric shock will occur.
Features of installation of combined models
The connection diagram of the switch, combined in a common housing with a socket, is somewhat different from that described above. And the main difference is the presence of an additional neutral wire laid from the junction box directly to the outlet. In this case, the output from the switch will have two double wires.

When connecting stranded wires, in order to exclude them from breaking off under the pressure of a screw clamp, the exposed sections of the cores are equipped with NShVI lugs
To make a safe connection of the switch with a socket, it is better to use a wire with a cross-section of 2.5 square mm. And already directly to the lighting devices from the switch, lay a cable of 1.5 squares.
At the final stage of installation, it remains only to verify the correctness of the switching wires and install a decorative frame. To check the correct connection, you need to turn on the switch and apply voltage.
When you turn on the first key of the device, one lamp should light up, when you turn on the second, the next horn of the chandelier or a connected electrical appliance.
The frame is fixed with a clamping insert. You need to slightly press on it and with a little effort click on the sides.
More details about installing combined sockets are written in this article.
Three-way switch connection sequence:
Three-key switch assembly with socket:
Device installation example:
By assembling the device in accordance with the wiring diagram and adhering to safety precautions during installation, you can be sure that the circuit breaker will operate without interruption for many years.
Maybe you already had to install a three-key switch yourself and you know the subtleties that we did not take into account in this article? Or have questions about the topic? Please write comments, share tips, ask questions in the block below.